The robot is driven by a Universal Windows Platform (UWP) application of our own creation called RubiksCubeRobot. By sending control signals to the robot's 8 servos and webcam, the application photographs the cube, performs the image and color recognition on the photos, determines the initial position of the cube, computes the sequence of rotations necessary to solve the cube, and then executes the sequence. The app can be used on Raspberry PI running Windows 10 IoT Core, or a regular PC running Windows 10.
In the evaluation mode, the app does not require a registration key, but is limited in functionality (see below for details). A permanent registration key is available for a small one-off fee. The license fees, which include life-time upgrades and maintenance, are as follows:
* The discounted price for the personal-use license can be claimed if you post a photo of your robot on Thingiverse under "Post a Make".
What's New in Version 3.0.114.0:
The following instructions assume that you have already downloaded and installed Windows 10 IoT Core Dashboard on your local PC, installed the Windows 10 IoT Core operating system on your Class-10 Micro SD card, booted your Raspberry PI from it, and connected the PI to your local network via WiFi and/or an Ethernet cable. Your Raspberry PI device should be showing in the My devices list of the IoT Dashboard:
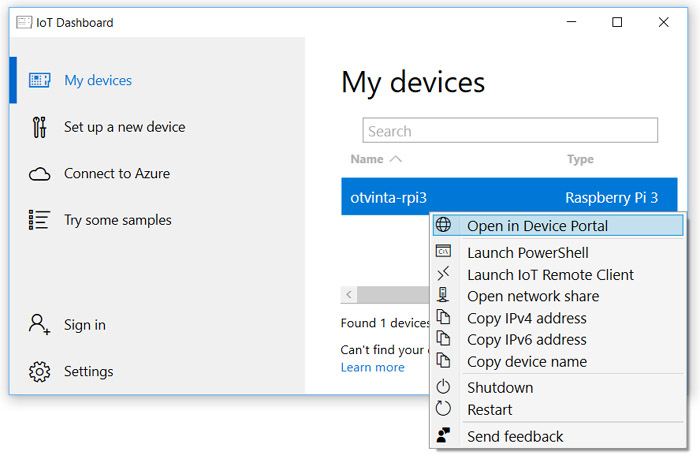
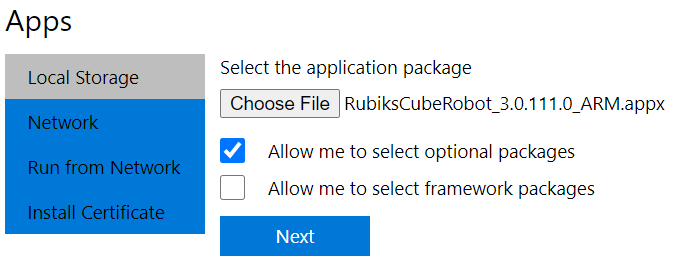
To install the RubiksCubeRobot onto your PI, please follow these easy steps:

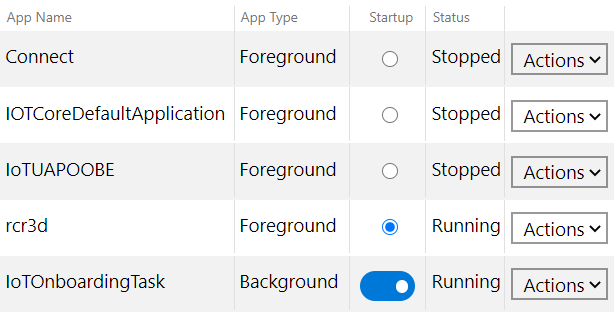
That's it! rcr3d (the name of the app) should now appear under Apps. You can start the application by choosing "Start" in the Actions drop-down box, and mark it as startup by clicking on the radio button in the Startup column.
WARNING: Not every camera works correctly on Raspberry PI. Some high-definition cameras produce distorted pictures and cannot be used.
Follow this link to install the app directly from the Microsoft Store:
https://www.microsoft.com/store/apps/9NNCXHKWPGCZ
Unzip the content of the download to a temporary directory such as "c:\temp". Prior to installing the app on your PC, you need to install the certificate in the Trusted Root Certification Authorities of both the Current User and Local Machine sections of the certificate store. This only needs to be done once.
Double-click on the .cer file in the temporary directory, click Install Certificate, select Current User, then select "Place all certificates in the following store", and select the Trusted Root Certificate Authorities folder. Repeat this procedure but this time select Local Machine instead of Current User.
Once the certificate is installed, double-click on the .appx file in the temporary directory to install the app on your PC.
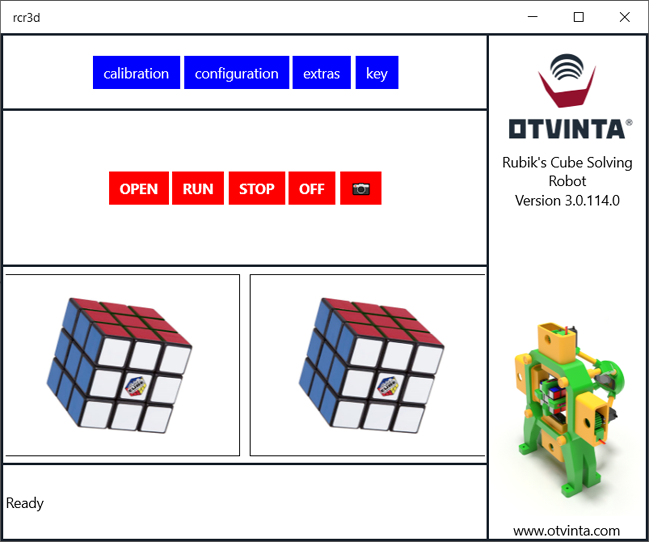
The main app screen looks as follows:
Photographing phase:

Assembling phase:
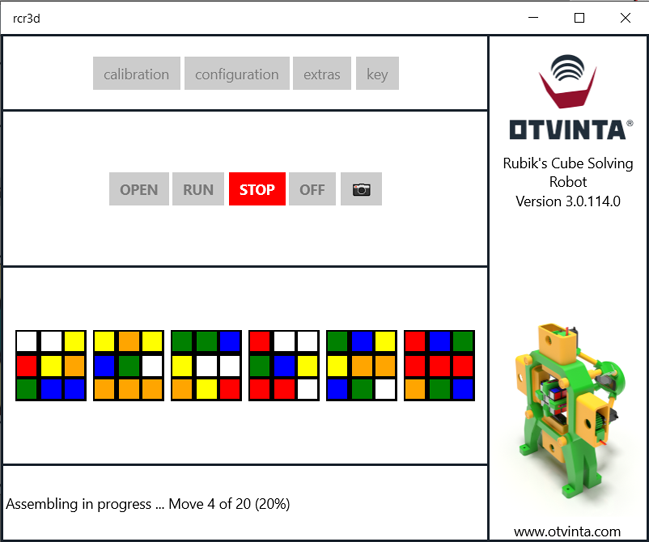
The blue and red buttons on the main page perform the following functions:
The 1st required step is to enter all the servo target values in the Calibration Center:
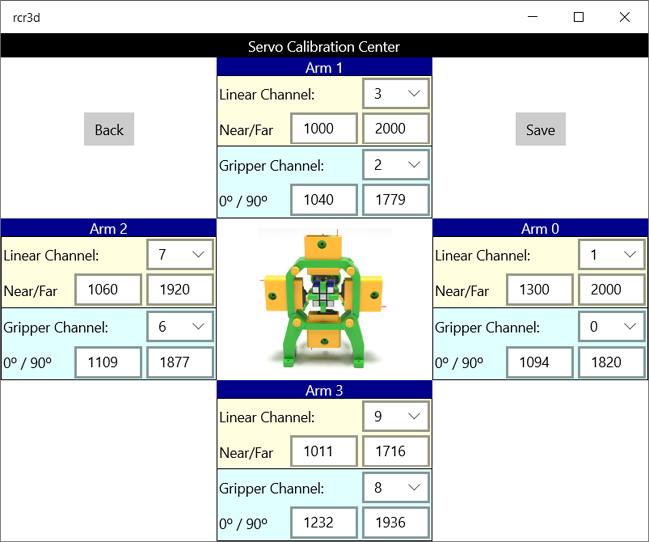
The screenshot above shows the settings for our robot, but you must obtain your own numbers during calibration using the Pololu Maestro Control Center software.
If your PC has more than one camera attached (laptops almost always have their own built-in camera), there is a 2nd required step: press the configuration button, and in the Configuration Center, select the robot's webcam via the Camera Name drop-down box. The other configuration parameters will be covered in detail in the next section.
Before clicking the RUN button, make sure all 8 servos are plugged into the Maestro servo controller, both the Maestro and webcam are plugged into the Raspberry PI's (or your PC's) USB ports, and the power source is connected to the Maestro.
Insert the cube and click the RUN button. Be prepared to hit STOP immediately if the cube slips out of the grippers, or some other malfunction occurs.
The robot will perform the necessary manipulations of the arms and grippers, and take 2 photographs for each face that are going to be displayed immediately. If image processing or color recognition fails, an error will be displayed, and the arms and grippers returned to the open position.
Take good note of the directions in which the cube is rotated during the photographing phase. If everything is set up and wired correctly, the cube should first be rotated around the horizontal axis, and then vertical axis, in the directions shown by the red arrows on the images below.
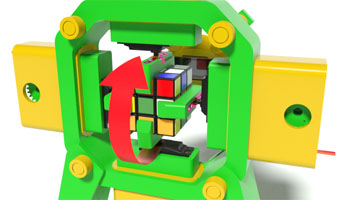
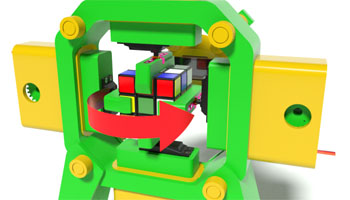
If your robot is rotating the cube in a wrong direction, it is usually an indication that the settings for the upper/lower arm, or left/right arm, are reversed. This would prevent the app from determining the cube's colors correctly, and result in the error message "Unsolvable Cube".
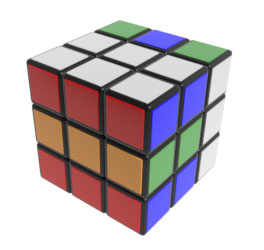
The app can be evaluated without a registration key. In the evaluation mode, the solving sequence is limited to 5 steps. A 90°, 180° and 270° turn of a face is considered a single step. Therefore, without a key, the app is still capable of solving a slightly scrambled cube such as the one shown here:
The app displays the following message in the evaluation mode during the assembling phase:

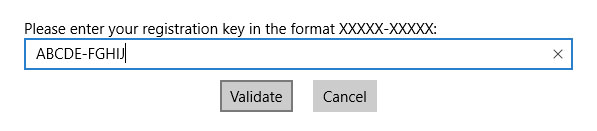
Solving a thoroughly scrambled cube requires a registration key. Once the key is purchased, it needs to be entered in the app by pressing the KEY button. Enter your key and press Validate. Your device needs to be connected to the internet to complete the validation. Once the key is validated, the app no longer needs to be connected to the internet to function. Please contact us to purchase your permanent registration key, or send the correct licensing fee to our main email via PayPal.
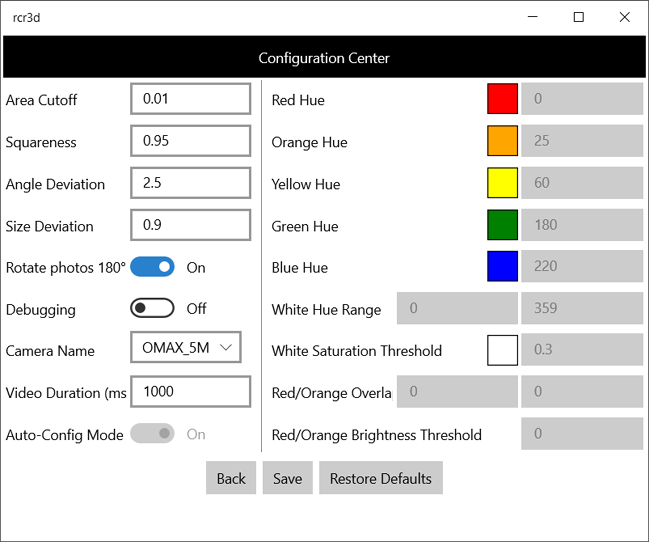
The app requires almost no configuring at all. The essential configuration parameters are: Rotate Photos 180°, Debugging, Camera Name, and Video Duration.
The numerous hue, saturation, brightness and glare-related parameters that can be seen on the right side of the Configuration screen are holdovers from previous versions, and are permanently disabled.
The Area Cutoff, Squareness, Angle Deviation and Size Deviation parameters control the square zone recognition code. The default values have been chosen by trial and error and are generally considered optimal. Changing them is not recommended.
The app is designed to provide an insight into its thinking process. When the Debugging toggle switch is on, the app creates a PDF file for every run containing the photographs it has taken, color recognition results, and other information. On Raspberry PI, the PDF files can be found in the folder \Data\Users\DefaultAccount\Pictures. On a regular PC, this folder is This PC\Pictures.
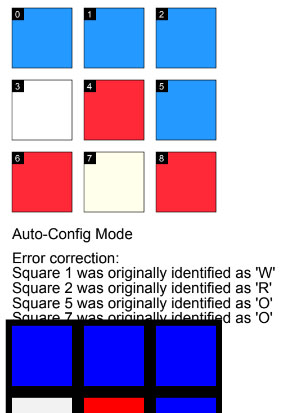
A typical page from the PDF file looks as follows:

The top of the page displays the two photographs taken per cube's face with the zone detection results superimposed over the images. The center square is marked with a dashed outline, the other squares with a solid outline.
The color diagram on the middle left displays the color zones with their hue, saturation and brightness values. This information is generated by the old legacy code and discarded in the Auto-Config mode.
The color diagram on the middle right is the output of the color recognition module in the Auto-Config mode, before error correction is applied. Right below it, error correction log entries may be displayed (not shown here). At the bottom right, the final result, with error correction applied, is displayed.
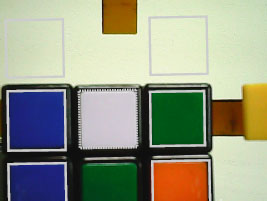
The debug PDF files are a valuable troubleshooting tool. For example, during a run, the app has generated the error ERROR_UNSOLVABLE_CUBE. The PDF file generated during that run offers an instant explanation for the failure: a mechanical problem caused the cube to be way off center during photographing (see image below). As a result, the color zones were not correctly identified as half of the cube's face was not even within the camera's view.
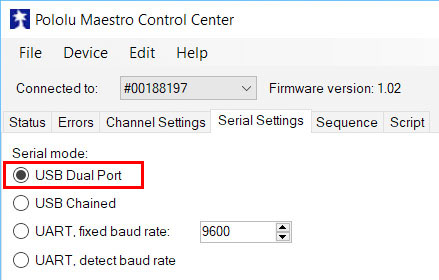
Make sure your Maestro controller' serial mode is set to USB Dual Port via the Pololu Maestro Control Center (Serial Settings tab), and the Apply Settings button is clicked:
If the camera is not properly mounted or not pointing at the middle of the cube, a photo may look like the image above . If the app can't see the entire face of the cube, it can't process it. Make sure the center of the cube is roughly in the middle of the photograph. Use the Camera button to take test photos before a run. Adjust the camera's position in the camera holder if necessary. Also make sure the grippers hug the cube tightly to avoid shifting while the cube is being photographed. Adjust servo calibration values if necessary.
If you are running an older version of the app with a high-resolution camera, the robot may display the error ERROR_ZONE_DETECTION_ERROR right after the first face of the cube is photographed, while the debug PDF shows blurry and distorted images:
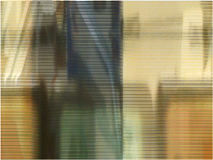
To fix this problem, please upgrade to the latest version of the app.
Upside-down images are guaranteed to cause the error ERROR_UNSOLVABLE_CUBE accompanied by a plethora of error correction entries in the debug PDF file:
If your camera has this "feature", turn on the Rotate Photos 180° toggle switch on the Configuration screen.
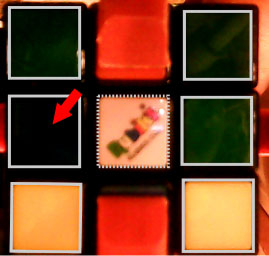
If the photographs are too dark, some squares may appear completely black, like the square marked with a red arrow on the image below. This will cause the app to generate the error ERROR_COLOR_COULD_NOT_BE_DETERMINED. Make sure the cube is reasonably well lit, while avoiding glare.
It is critical that your robot photograph the cube's faces in a particular order. Please refer to our introduction video, and Section 5 (bottom), for the correct directions of rotation during photographing.
If some or all of the gripper servos are calibrated incorrectly and turn from the neutral to 90° position in the wrong direction, the app won't be able to correctly reconstruct the cube's initial position and therefore, won't be able to resolve it. Another possible reason is that the settings for the upper/lower arm, or left/right arm, are reversed.
Please do not hesitate to contact us if your robot keeps refusing to solve the cube. We will do our best to help you.
As of Version 3.0.107.0, the app is equipped with a new button, Extras, which takes the user to the Extra Configuration Parameters screen. On this screen, two additional features can be enabled and disabled: Voice Commands and Scrambling. This section describes both features in detail.
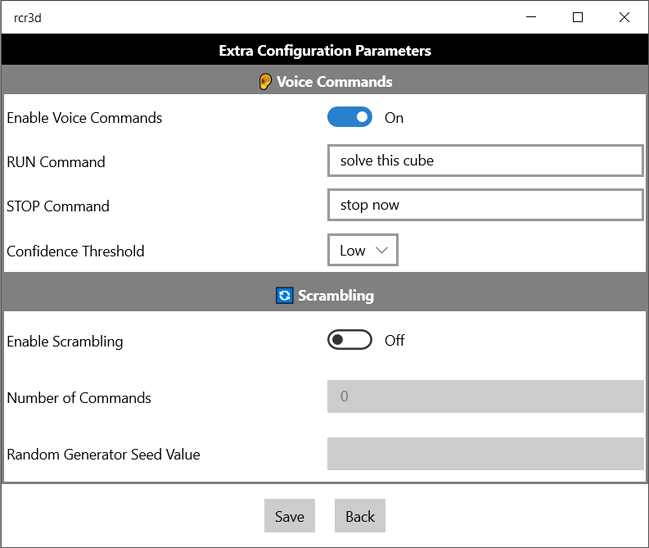
As of Version 3.0.107.0 of the app, the robot can be started and stopped via voice commands. To enable voice commands, press the EXTRAS button on the main screen, and put the Enable Voice Commands toggle switch in the On position on the Extra Configuration Parameters screen. Enter the phrases for the RUN and STOP commands. In our example, these phrases are "Solve this cube" and "Stop now", but you can pick your own commands.
The Confidence Threshold drop-down box specifies the level of confidence the voice recognition algorithm needs to have to execute a command vs. ignoring it. We recommend setting this option to "Low".
When the Enable Voice Commands option is enabled, an ear symbol is displayed in the status area of the main screen. When a command is received but not recognized, the ear symbol momentarily increases in size and goes back to its normal size.

When the app is running on a Windows 10 PC, the microphone needs to be enabled for the app. To enable it, go to Settings -> Privacy -> Microphone and make sure the toggle switch is on for the RubiksCubeRobot app, as follows:
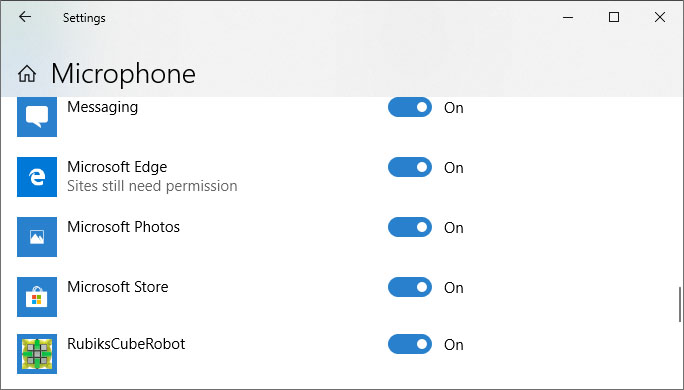
If the microphone is not enabled, the ear symbol will be replaced by a yellow exclamation sign.
Following your numerous requests, we have equipped the robot with a random scrambling feature. To enable it, press the EXTRAS button on the main screen and put the Enable Scrambling toggle switch in the On position on the Extra Configuration Parameters screen. You also need to specify the number of commands, which should be greater than 0, and optionally a random generator seed value, which is an arbitrary text string.
When scrambling is enabled, the RUN button on the main screen becomes the SCRAMBLE button:

When the SCRAMBLE button is pressed, the robot generates a random sequence of turns, and then executes this sequence. The length of the sequence is specified via the Number of Commands parameter. A single command is a 90°, 180°, or 270° turn of the lower, upper, left, right, front or back face of the cube.
When the Seed Value parameter is empty, the sequence is completely random and unique for every invocation. When the Seed Value is non-empty, it is used as the seed value for the pseudo-random number generator employed by the app. Therefore, a certain seed value generates the same scrambling sequence for every invocation.